Certification
The Cloud Sprinkler™ is certified with the Regulatory Compliance Mark (RCM) for the Australian market and meets European Union (EU) health, safety, and environmental protection standards for the European market.


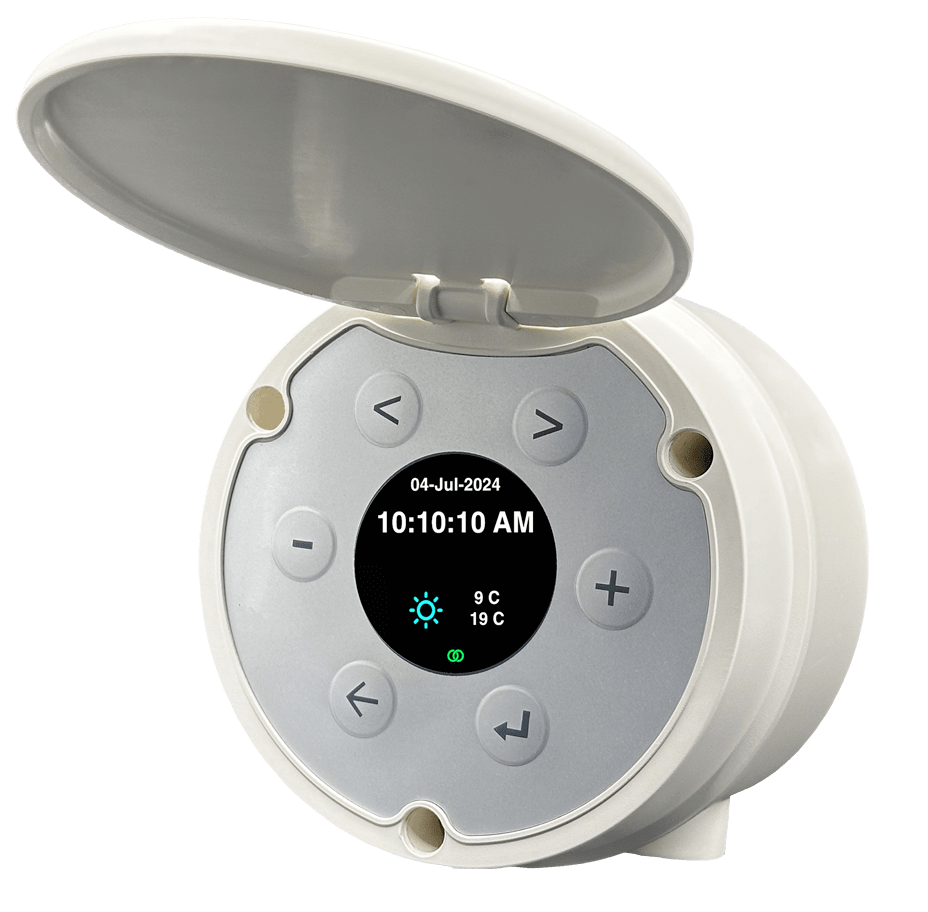
Real mirror view technology. Simple and easy menu structure. Real-time reading of sensor data.
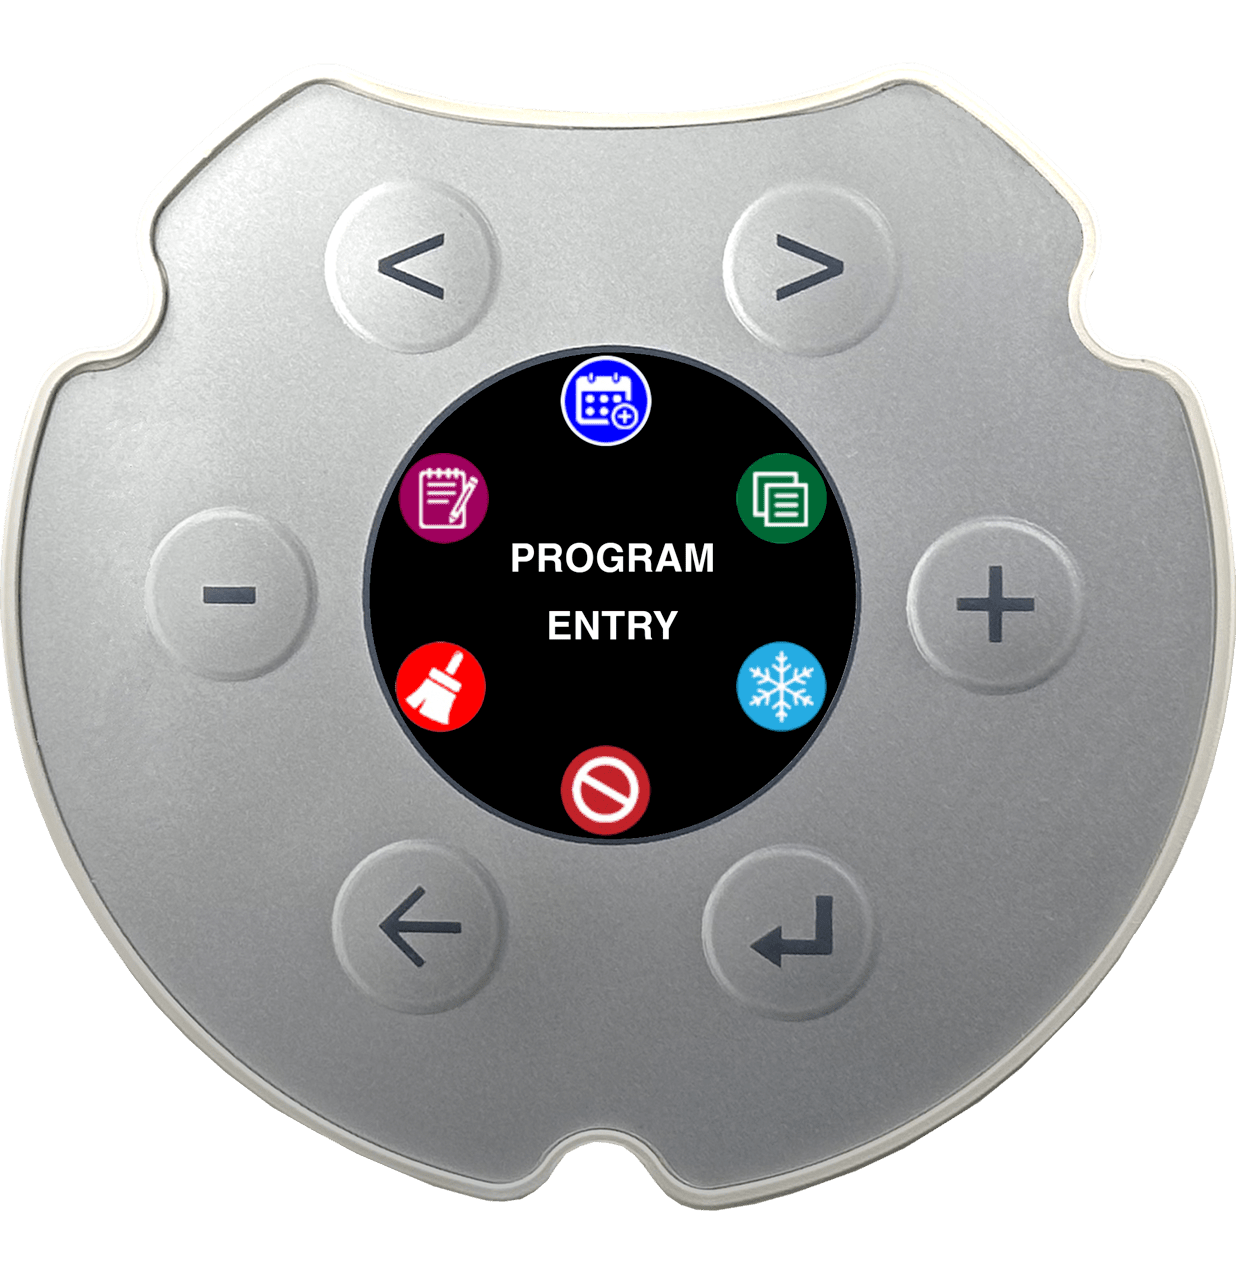
Multicolor IPS display with 6 keys for simple rotating menus, enabling easy local programming.
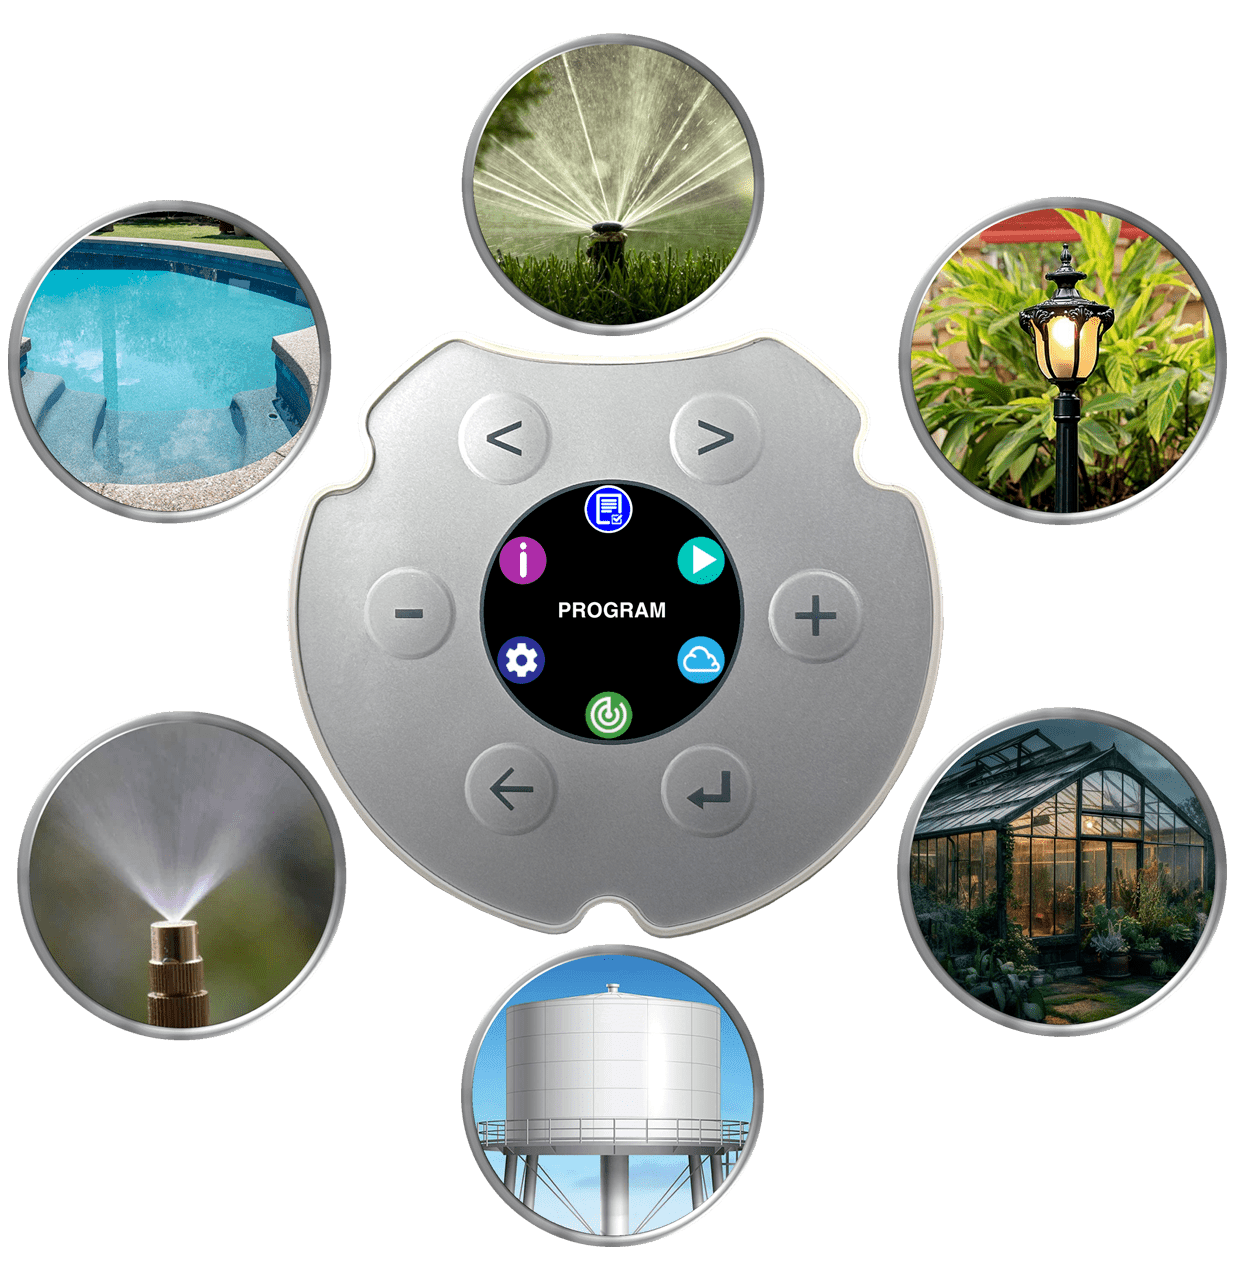
Easy to configure for different applications like lighting controller, mist controller, pool pump timer,greenhouse controller, tank filling system, etc.
Weatherproof and size-optimized enclosure can be easily installed outdoors in limited spaces. No need for an external enclosure.'
A multi-purpose industrial-grade irrigation controller designed to replace multiple devices with a single unit. The Cloud Sprinkler™ can be easily configured as a professional water-saving irrigation controller, tank level controller and monitor, mist controller, lighting controller, pool pump controller, etc. The multi-wired zone, along with AgroGlide™ Two-Wire technology, enables the connection of valves and sensors using a single pair of cables or in a conventional multi-wire setup for more potential use case scenarios.
The Cloud Sprinkler™ is certified with the Regulatory Compliance Mark (RCM) for the Australian market and meets European Union (EU) health, safety, and environmental protection standards for the European market.
◉ 8 Programs
◉ 4 Start times Per Program
◉ Odd, Even Day Selection
◉ 2-Weeks Master Day Selection
◉ Cyclic Program
◉ Hour, Minute, Second Intervals
◉ Volume Based Interval
◉ Flow Skip
◉ Pressure Error Skip
◉ Manual Run Program
◉ Manual Zone Run
◉ Pump Selection Option for the Manual Zone.
◉ Internet Based Local Weather data
◉ Forecast Rain Fall
◉ Forecast Temperature
◉ Historical Rain Fall
◉ Historical Temperature
◉ Multi-Color IPS Display
◉ 6 Keys Operation
◉ Simple Menu Structure
◉ Digital Lock
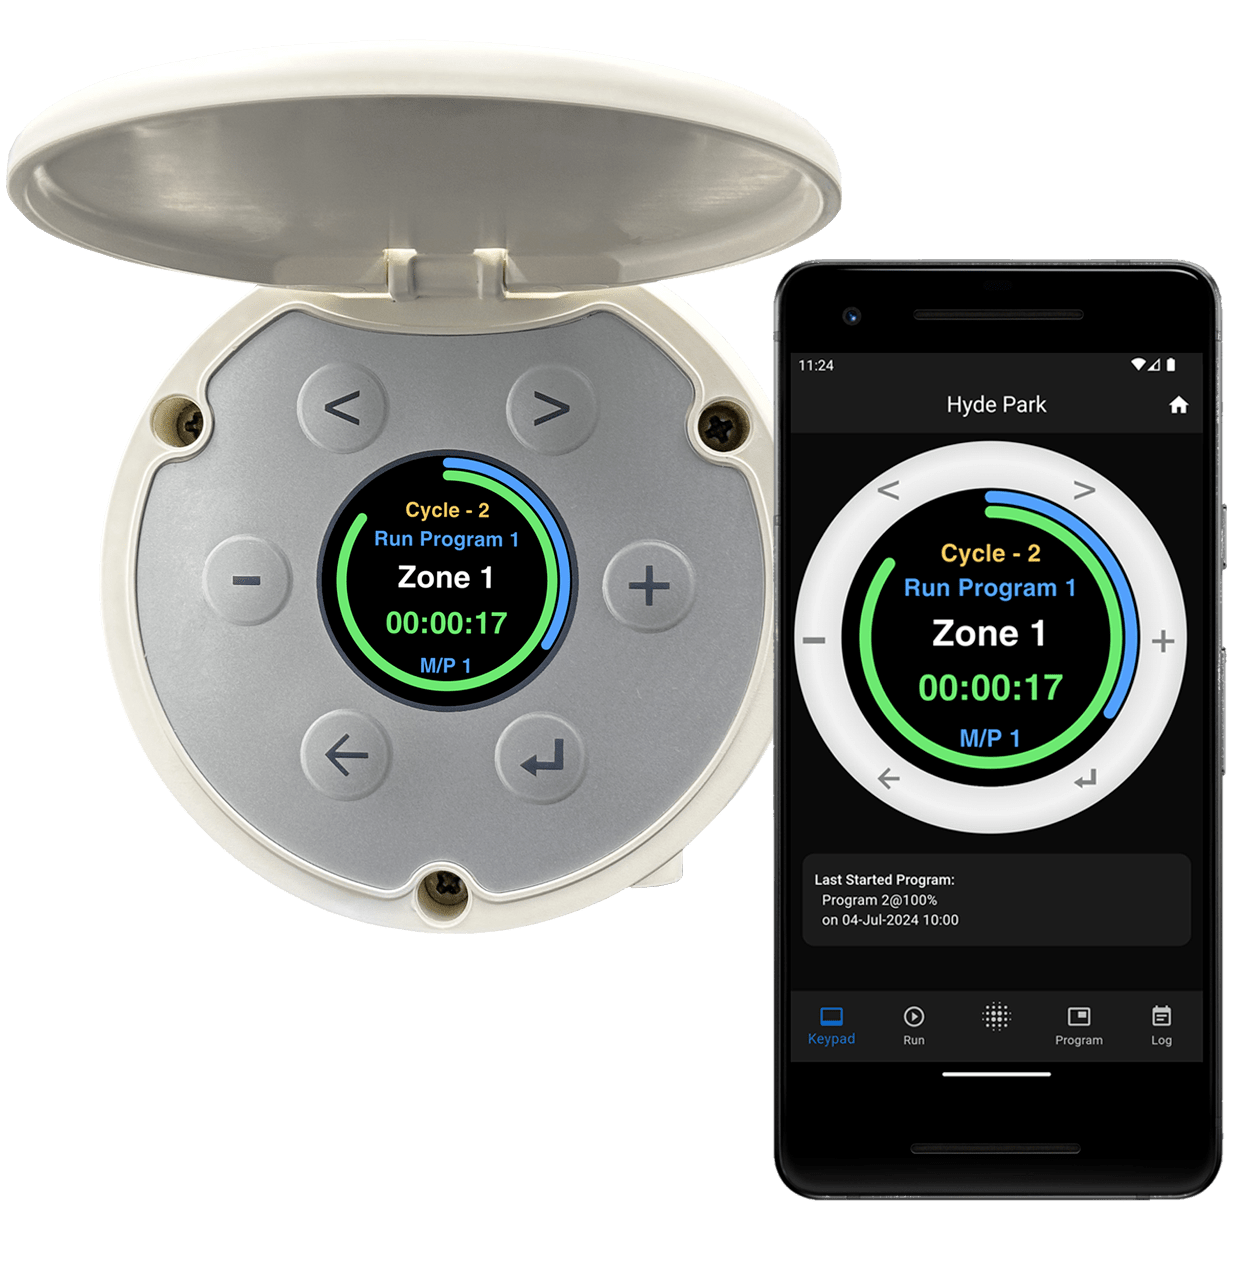
◉ Remote Controls Via App
◉ Temperature Schedule
◉ Tank Level Controller
◉ Mist Controller
◉ Soil Moisture Schedule
◉ Pressure Fault
◉ 8 Direct Zones
◉ 2 Pumps
◉ 2 Water Meter Input
◉ Rain-Switch Input
◉ AgroGlide™ 2-Wire
◉ Pluggable Terminals
◉ Indoor Outdoor usage
◉ Space saving enclosure
◉ 20mm Conduit for Cables
◉ Flame retardant ABS
◉ Weather Based
◉ Intelligent Sensor Based
◉ Seasonal Adjustment
◉ Automatic Schedule in Case of Error.
◉ High Pressure
◉ Skip Pressure
◉ Low Pressure
◉ Flow Skip
◉ Water Leak
◉ Push-Notification To App
◉ Email Notification
 Skip to left key. Skip item position to
left.
Skip to left key. Skip item position to
left.
 Skip to right key. Skip item position to
right.
Skip to right key. Skip item position to
right.
 Minus key. Rotate menu and decrement
selected item.
Minus key. Rotate menu and decrement
selected item.
 Plus key. Rotate menu and increment
selected item.
Plus key. Rotate menu and increment
selected item.
 Back key. Navigate to back menu.
 Enter key. Enter to selected menu.

Cloud Sprinkler™ can be programmed easily and conveniently
using 6 types of
keys
and a
display.
The
and
keys are used to increment
and decrement menu items, numbers, or characters. The
and
keys are used to skip to the next digit or
letter. The
key is used to go back to the previous menu. The
key is used to enter the
selected menu.
The
and
keys are also used as shortcut keys. From the home menu, while a program is running,
press the ">" key to navigate to the program running menu. From the program or manual zone
running menu, press the
key to stop the current running program or manual run zone. From the
home menu, the
key is used as a shortcut to the fault menu if there is any fault
indication.
All menus are grouped together into 6 sets called main menus. Most of the main menus are further subdivided based on functionality.
To set up Wi-Fi connection, navigate to SETTINGS > Wi-Fi > Setup.
To add Cloud Sprinkler™ to your account, use the QR code located in the SETTINGS > LINK menu.
For more menu details, click the button
below to access interactive menu information.
or
key to select the main menu, then press the
key to navigate to the selected menu.
or
key, then press
or
key.
or
key.
key.
 and
and
 keys to increment or decrement the digit. Use the
 and
and
 keys to change the digit to the next or previous one.
To disable the start time, increment or decrement the
hour digit until
"Disabled" is shown on the corresponding start time
position.
or
keys. Use the
or
keys to change the days. You can also set the day
type to All, Odd, or Even when the cursor is at the day
option.
or
key. To change the option to Auto Weather, use the
or
key.
or
keys for increment or decrement digit and use
or
keys for change digit.
or
key.
or
key.
or
keys and change months using
or
or
keys and change program by
or
keys. Select 0 Hour for set permanently or select desired delay.
or
key to change the program. Press the
keys to change the digit to the next or previous one.
To disable the start time, increment or decrement the
hour digit until
"Disabled" is shown on the corresponding start time
position.
or
keys. Use the
or
keys to change the days. You can also set the day
type to All, Odd, or Even when the cursor is at the day
option.
or
key. To change the option to Auto Weather, use the
or
key.
or
keys for increment or decrement digit and use
or
keys for change digit.
or
key.
or
key.
or
keys and change months using
or
or
keys and change program by
or
keys. Select 0 Hour for set permanently or select desired delay.
or
key to change the program. Press the
 key to clear. A confirmation menu-manual will appear; press
to clear or press the
key to clear. A confirmation menu-manual will appear; press
to clear or press the
 key to go back to the previous menu-manual
without clearing the program.
or
key.
key to go back to the previous menu-manual
without clearing the program.
or
key.
Program schedule and zones can be run manually. Use the
or
keys to select either Program or Zone.
For the program, select the program number by pressing the
or
keys. Press the next step to enter the program
percentage by pressing the
key. Once a suitable percentage is selected by using
or
key, press the
key to start the
program manually. Make sure there is a valid time or volume set for
the program zones to
run.
For manual zone run, select zones from start to end. Then, set the
hours and minutes.
There is an option to select the
pump as well. To change parameters, use the
or
keys, and to set values, use the
or
keys.
or
keys to select the Forecast or Historical option.
Wi-Fi is compatible only with 2.4 GHz networks.
Select Wi-Fi Status or Setup by using
or
key, then press
key
The Wi-Fi status shows the MAC address, IP address, and signal strength
Configure Wi-Fi using either a phone or the keypad. These
options can be selected by
or
key, then press
key
Wi-Fi configuration By Phone:
Note: There is a chance of disconnection and reconnection to the existing Wi-Fi network due to no internet connection. Continuously monitor the Wi-Fi connection to Cloud Sprinkler.
Once you have completed the steps, your Cloud Sprinkler will be connected to your Wi-Fi network.
Wi-Fi configuration By Keypad:
Enable Wi-Fi setup in Cloud Sprinkler by navigate to Settings>Wi-Fi Setup>By Keypad option.
The Wi-Fi will scan for the nearest Wi-Fi router and display
available stations. Select the desired Wi-Fi station and
press the
key to enter the passkey.
Passkey characters are grouped into three categories:
alphabetic small letters, capital letters, numbers and
symbols.
These are selected by pressing the
key.
Each letter can be selected by pressing the
or
keys and then pressing the
key. To move the cursor back, press the
key. Once all the digits of the passkey are selected,
keep pressing the
or
keys until the 'Set' text at the bottom of the display is
selected, then press
the
key to set the passkey.
Note: The Wi-Fi setup menu-manual option is not available on the app display section.
Select the input type using the
or
key. Press the
key to enter the setup.
The water meter pulse rate can be selected using the
or
key. Use the
or
key to select the water meter number.
For the rain switch, there is an option to select a closed
or open contact type
sensor.
Use the
or
key to select different options such as sensor type, program
numbers, and
rain delay.
Use the
or
key to change individual menu-manual values.
or
keys and digit values with
or
keys. Press
for validate time and date to system.
There is an option to automatically set the time and date based on location at the app level.
or
keys for change valve numbers. Press
key to exit from Valve Find function.
Warning: Do not connect the pump to the controller while using the Valve Find feature. It may damage the pump. The Valve Find feature automatically disables after 4 minutes.
key to update the firmware if an update is available.
Automatically restart once
finish updating.
Warning: Do not power off the device while firmware updating.
or
key to navigate to the next or previous event log.
or
key to view more faults, if any.
or
keys to change the water meter.
key for see
online AgroGlide™ AG-valves.
key to see
online AgroGlide™ AG-WaterMeter.
or
keys to change the AG-WaterMeter address.
key to see
online AgroGlide™ AG-Switch.
or
keys to change the AG-Switch address.
Different kinds of AG-Switch functions can be configured through the app.
key to see
online AgroGlide™ AG-Moisture/AG-Temperature
sensor.
or
keys to change the AG-Moisture/AG-Temperature
address.
key to see
online AgroGlide™ AG-Pressure sensor.
key to see
online AgroGlide™ AG-Level sensors.
or
keys to change the AG-Level address.
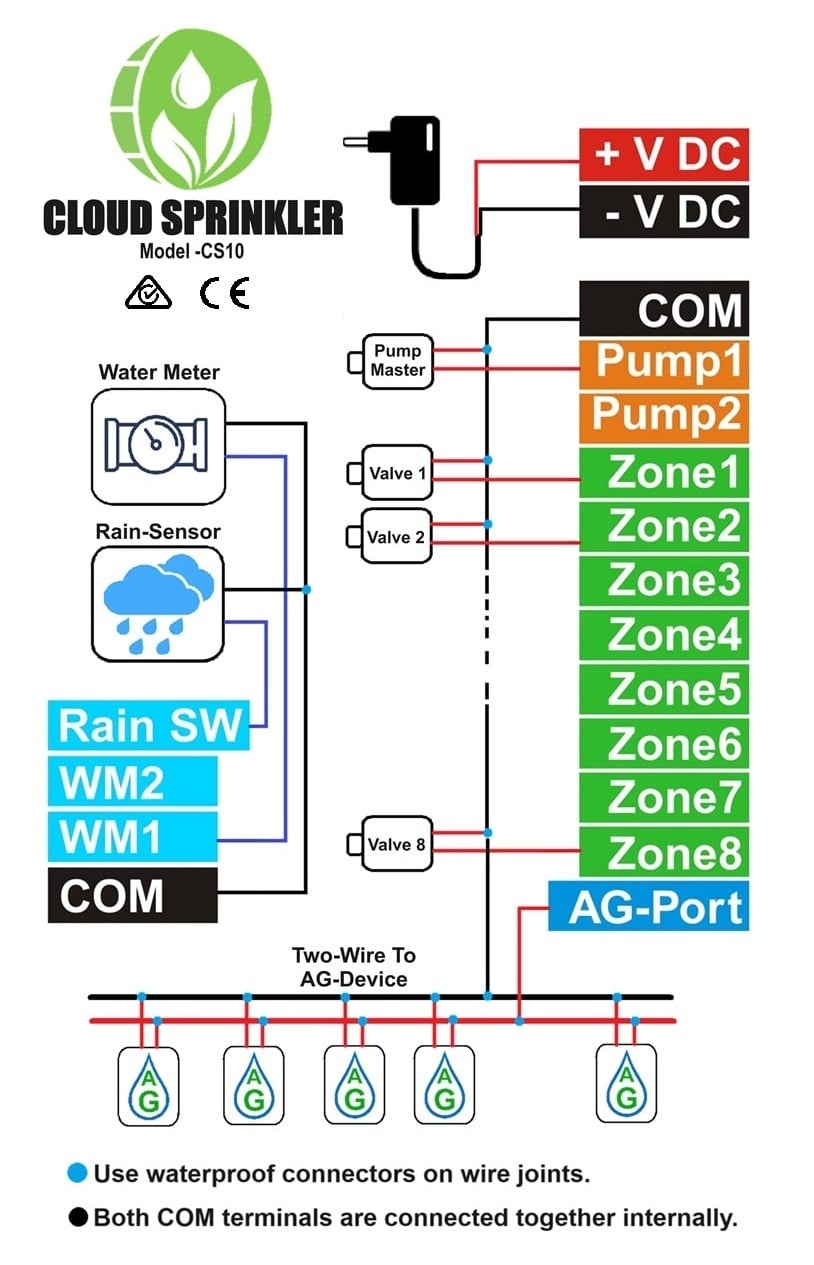
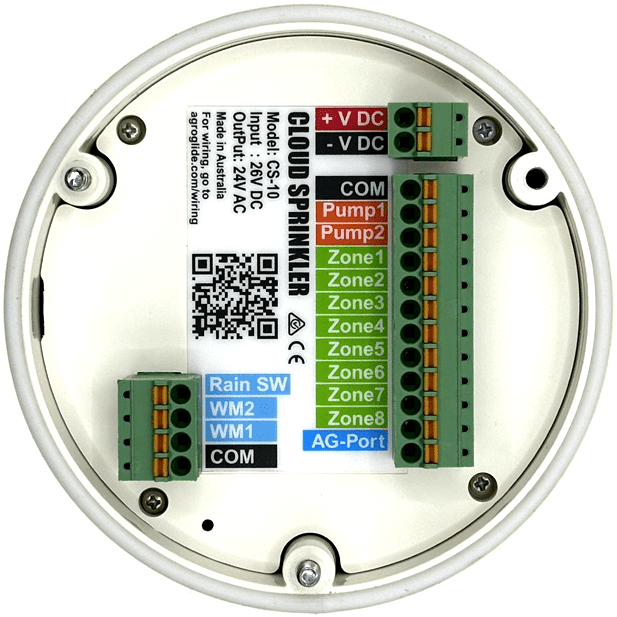
Follow the wiring diagram included with your Cloud Sprinkler™. Here are the general steps:
Note: To find the QR code, go to the Cloud Sprinkler™ LINK menu (SETTINGS > LINK) and press the 'Enter' button.
Any number of devices can be added to a single user account. All devices will be listed on the home screen for use.
If you encounter any issues during installation, please contact our customer support team at support@agroglide.com.
Thank you for choosing Cloud Sprinkler™. We are confident that it will provide you with reliable and efficient performance for years to come.